Build a Bucksaw (Competition registration)

  • Hey Guest, Early bird pricing on the Summer Moot (29th July - 10th August) available until April 6th, we'd love you to come. PLEASE CLICK HERE to early bird price and get more information.

British Red

M.A.B (Mad About Bushcraft)
Dec 30, 2005
26,741
1,989
Mercia
Chris,

There's no rush mate - end of January is the closing date. Its just nice to chat about progress etc.

Red
 

chrisanson

Nomad
Apr 12, 2006
390
7
61
Dudley
British Red said:
Chris,

There's no rush mate - end of January is the closing date. Its just nice to chat about progress etc.

Red


nice noe m8 maybe i can get somethin done over the holidays.
Chris
 

British Red

M.A.B (Mad About Bushcraft)
Dec 30, 2005
26,741
1,989
Mercia
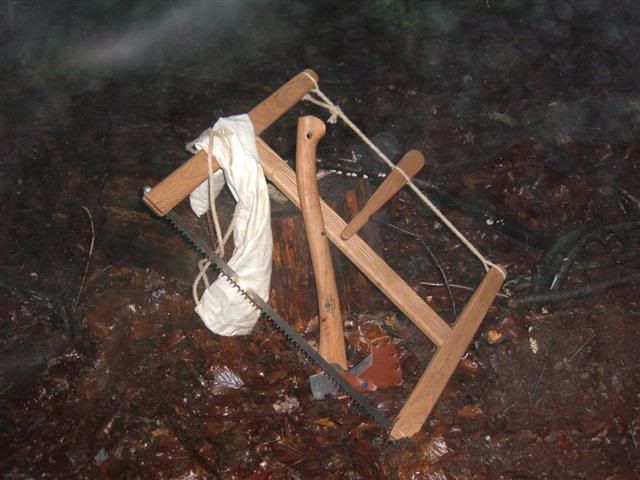
Well, I promised to publish my efforts to make a bucksaw

I have set myself a slightly odd challenge, which is to make a robust and stiff frame out of parts that are accessible to all. I'm aiming for under £5 and certainly no more than £10 including the blade

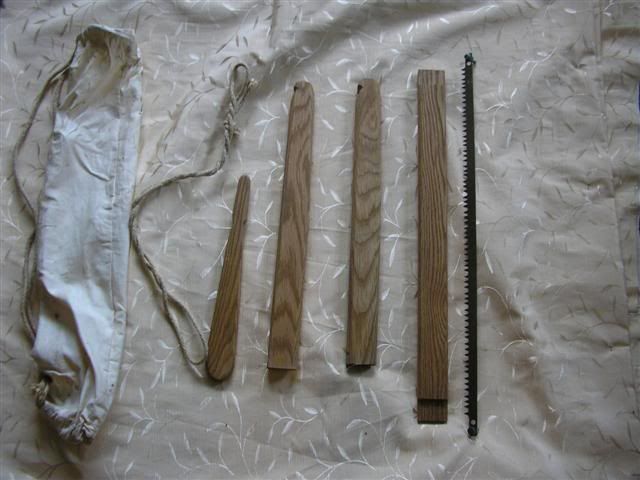
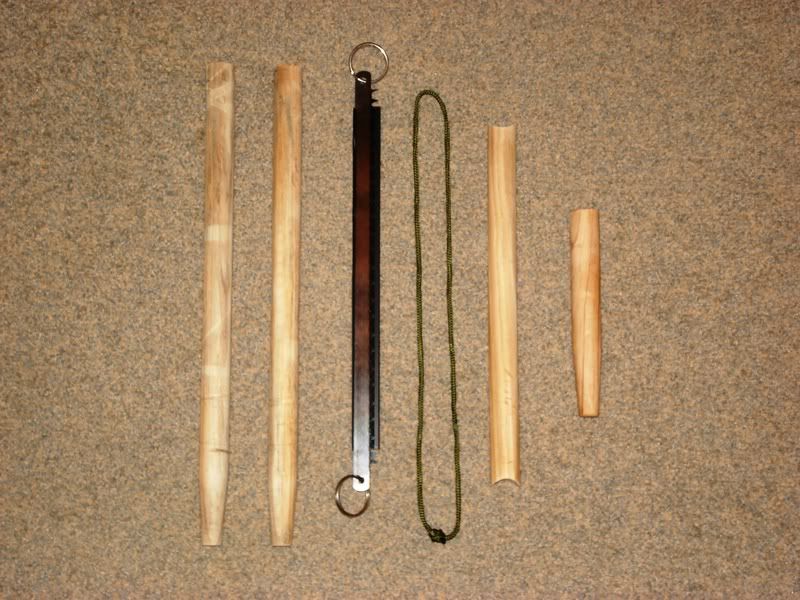
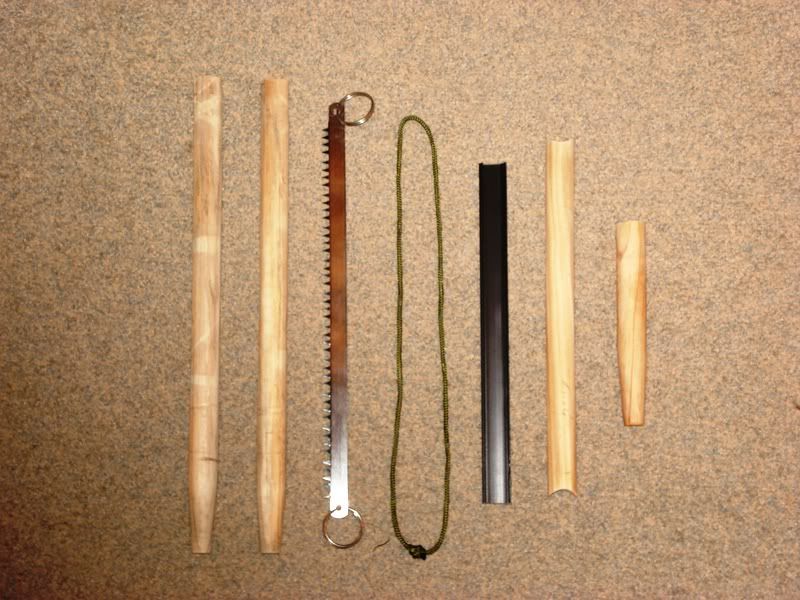
Here are the bits I've got together

318121500_d86fcf5eb8.jpg


I bought two hardwood broom handles, a length of 8mm threaded rod a blade (I got a bulk deal recently a bit of 10mm ally tube and a handful of wing nuts plus two 6mm coach bolts. Say about £6 all up - within a tenner even if I bought the blade retail.

I sawed the two 48” broom handles off into two 24” uprights with the “rounded part” at the top. One of the off cuts was slightly cut down to make the cross member. The rough layout will be something like this

318121498_e2d5ff33d0.jpg


Now I have measured the cross strut to the exact length of the blade (eye to eye). I wrapped some sandpaper around an offcut of the broom and "indented" each end of the cross strut so it will fit tightly against the upright like this

318121501_fc1fdc2756.jpg


This leaves the end of cross member this shape

318121496_2ca153979c.jpg


So the fit comes like this

318121493_42b23400b1.jpg


I'll lock the cross member in with a "pin and socket" arrangement using some threaded bar and a hole in the upright. More on that later.

So we have two uprights and a cross member that fits snugly between them. Time to get the drill out. A 10mm hols (the same size as the ally tube) is drilled right through the top of each uprights.

324229366_da3fddcb98.jpg


Another hole is drilled halfway through the upright about a third of the way from the top. The measurement needs to be the same on both sides.

324229364_33ddcd9642.jpg


Next job is to cut some lengths of ally tube the right size to line these holes

324229368_449ec432ba.jpg


These are glued in place (super glue works fine, but rough up the outside of the tube first to give it a key). The tube is then filed and sanded to the contour of the wood (ally is soft so this doesn’t take long)

324229369_f87ca9de07.jpg


Right that’s the hole at the top done for the tensioner and the sockets further down for the cross strut.

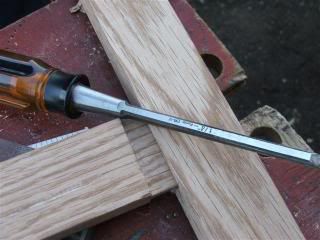
Next I clamped the cross strut and drilled a ¾” hole in each end

324229358_8055df7bb7.jpg


A piece of threaded rod was glued into this hole as shown below

324229361_376edcf5e2.jpg


This stud fits into the socket created earlier.

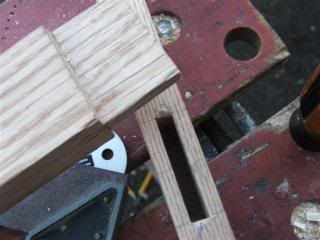
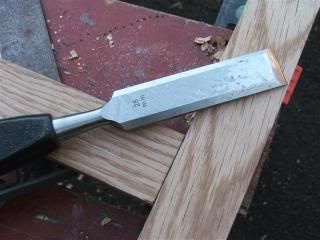
Next step is to turn the upright over. A 6mm hole is drilled through the upright at 90 degrees to the “through” hole drilled earlier. This is for the 6mm coach bolt that holds the blade in place. A saw cut is made to the correct depth to slot the blade in. A bit of trial and error is required to make the cut the right depth to align the coach bolt hole and saw blade hole.
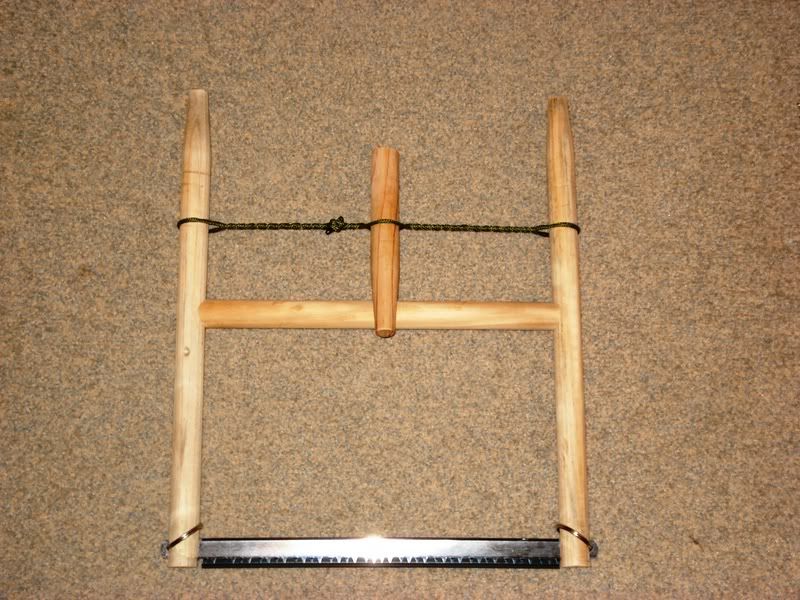
324233858_eca20bf668.jpg


That’s pretty much it for construction. I then rubbed the whole thing down and gave it a wipe with some woodstain and then waxed it for protection

To assemble, bolt the blade in place, slot the cross member into the sockets and slide the threaded rod through the lined holes. Tighten the butterfly nuts at each end of the threaded bar and you are good to go. You will notice in the finished picture that the uprights are slightly “bowed”. This puts a great tension on the saw blade.

I guess there’s no more than an hours work in this and, if a klutz like me can do it, anyone can. The saw really does work very well with no “twisting” which I suspect is to do with the slight flex tensioning the wood

324233860_8876474989.jpg


Don't know how long it will hold up - slightly thicker wood might be an idea, but I'm happy enough for a first go

Not as pretty as some of those posted, nor as strong as others nor as well made as any I suspect. Not an entry either though :lmao: . I hope it encourages someone else to try and deprive me of my axe however :D

Red
 
H

Heathenpeddler

Guest
Darn BR, that's looking like something even I could do! Still got any of those blades left? Maybe I could make something worthwhile after all :)
 

British Red

M.A.B (Mad About Bushcraft)
Dec 30, 2005
26,741
1,989
Mercia
Sure have Heathen Peddler. If you want one PM me your address and I'll post one off to you. I have 30" 24" and 21" (although you will certainly need stiffer wood for a 30" bucksaw - it would be a beast of a saw). No charge of course (paying it forward).

Red
 

stevec

Full Member
Oct 30, 2003
550
148
Sheffield
We i'm most impressed by all that has gone before, i don't know if i'm in time, or if there are any of the bonus places left, if not, its no biggy, but here is my attempt all the same.
Blade 1.69 at wilco's
pine stripwood couple of quid for about 2.4m, i had a load left over from some DIY
nuts and bolts - liberated from work
string - 50m reel of guy rope about 6 quid at towsure
thats about it, i wanted a modle that self masked the blade so the handles fold down.
can't work out how to post the pics, i'll upload them to my gallery.

best regards
steve
 

British Red

M.A.B (Mad About Bushcraft)
Dec 30, 2005
26,741
1,989
Mercia
Stevec,

Course you have a slot. I've added your pics for others to see


20-12-06_1200.jpg


20-12-06_1158.jpg


20-12-06_1157.jpg


20-12-06_1155.jpg


I'm intigued by the "double layer" of the handle - its a great idea for protecting the blade - nowt humble about that mate

Red
 
Right, my entry is now complete :) . Its made from European Oak and is essentially two (contoured) uprights which are held apart by a cross-piece. This is held in place by a snug mortise and tenon joint, definitely not something to be attempted with blunt tools!

DSCF0428Small.jpg


DSCF0426Small.jpg


DSCF0423Small.jpg


I spent ages making these joint perfect, and it payed off as in testing there was no twisting bending snapping or unwanted movement.
It was given a good play/test yesterday by myself and kieran725, and the saw worked fine.

Below are all the components - (from left to right) ; Duffel Bag made from curtain backing material, Tightening rope, Tightening bar, the two upright/handle parts, cross piece/tenon and the blade (24")

PC220017Small.jpg


And the finished article, in the woods where it should be :) . Leaning against it is a Small Forest Axe for size comparison.

DSCF3204Small.jpg


cheers guys and British Red for organising this,

woodwalker
 
  • Like
Reactions: British Red

British Red

M.A.B (Mad About Bushcraft)
Dec 30, 2005
26,741
1,989
Mercia
Beutiful entries from woodwalker and Jamie. Reckon there could be a couple of finalists there.

Would it be rude to ask what happened to the rest of the stool? :D

Red
 

Big John

Nomad
Aug 24, 2005
399
0
51
Surrey
Interesting arrangement with the key rings Jamie - I guess once it's under tension they hold the blade secure and don't move?
 

British Red

M.A.B (Mad About Bushcraft)
Dec 30, 2005
26,741
1,989
Mercia
Well, I received a couple of requests for an improvised saw I decided today to try to make one. It is cheap and it means carrying the minimum of materials. Here’s what I started with

335287749_ce106b16a1.jpg


1 SAK (with saw), a hank of field line, two key rings and a 24” saw blade. The plan in future will be to slide the saw blade into the pocket of my Bergan where the frame sits – so no space overhead and a minimal weight implication

335287752_ec04039817.jpg


Well the first step was to get some wood for the frame. Out came the SAK saw blade (I could do all this with a belt knife but it would take a little longer). A couple of bits of hazel were quickly harvested. They were 1 ½” thick (and overdue for coppicing anyway).

335287756_a2c4a57563.jpg


Next step is to measure the saw blade against the thinnest piece. This piece will form the cross member. Its worth remembering that the saw blade will have a keyring through the holes and project beyond each upright. Measure it like that and assume the crosspiece needs to be 2” shorter than distance between the holes

335287758_160f2e4081.jpg


Next I sawed a ring about ¼ of the way through the cross member. This ring is about ½” from the end of the cross member and all the way around it.

335287761_37130f1989.jpg


Then I used the main SAK blade to cut straight down through the limb to the saw cut.

335287762_0a4ffd3cb9.jpg


Four of these cuts result in a square “peg” at the end of the cross member. I repeated this at the other end.

335304797_bfe9c45495.jpg


Next job was to make a socket for the peg to sit in. I decided to locate the socket about a quarter way down the uprights. I sawed about 1/3 of the way through the upright and then used the knife blade to carve out a square socket

335304800_dfc3b520eb.jpg


The next job was to make slots for the saw blade to sit in. I sawed these but they could be sliced just as easily. Sawing them does avoid the tendency for the split to run however

335304807_678e79baf4.jpg


The last step in making the three main pieces was to carve two notches to hold the tensioning cord

335304803_97b4cbe3a7.jpg


Lastly I need a bar to twist the tensioning cord. I split an off cut of hazel and drilled a hole using the awl on the SAK

335304811_727607f26c.jpg


Next step is to assemble the saw – it went together fairly well (although I needed to trim the pegs to get a good fit)

335304812_cd18ff12d3.jpg


A few final pictures of the saw assembled may help to explain what I did

The peg and socket joint

335314083_3357f2a205.jpg


The tension cord notch

335314087_ce65412e99.jpg


The tension bar

335314092_0ac267fba3.jpg


Its really not tricky to do, although it is hard to make one as tight as a “workshop made” take down saw. As in all things – my next one will be quicker and better!

Not an entry - just responding to requests (and enjoying messing about :D )

Red
 

BCUK Shop

We have a a number of knives, T-Shirts and other items for sale.

SHOP HERE