Antler handled firesteels with carbon stained epoxy engraving.

  • Hey Guest, Early bird pricing on the Summer Moot (29th July - 10th August) available until April 6th, we'd love you to come. PLEASE CLICK HERE to early bird price and get more information.
As posted to another thread I have finally been able to handle the firesteels from the group buy that I ran some time back.

I had some antler points that I thought would look nice: -

antler_steel_2.jpg


antler_steel_1.jpg


As one of these is a gift to an old friend that has shown an interest in bushcraft I thought I'd attempt to personalise it for him by engraving his initials "RY" onto the handle. Now my engraving is like my hand writing - poor due partly to the fact that I lost the top end of my right index several years ago and I've been too lazy to learn to write left handed :D

Sadly I never took a picture of the result - but suffice to say that the 2-3mm engraving did not stand out from the antler background enough for my liking and had also left sharp edges right where one would grip with ones thumb - which is not ideal.

Having ordered a curry I had a brainwave (first in a long time) that I could use a stained epoxy as a filler. So I got a slow match/char tube that was a gift, thanks Seorus, and burnt about 15mm leaving it to smoulder over a container. I collected the ash and mixed it in with the epoxy - result was a lovely dark glue/filler that I felt was a little bit bushcrafty with the carbon dye.

I flush filled this into the engraved trench and left it to go off over night: -


antler_steel_3.jpg


antler_steel_4.jpg


There was a slight amount of over-spill that needed to be removed. As carefully as I could I removed this with the tip of a Stanley knife blade: -

antler_steel_5.jpg


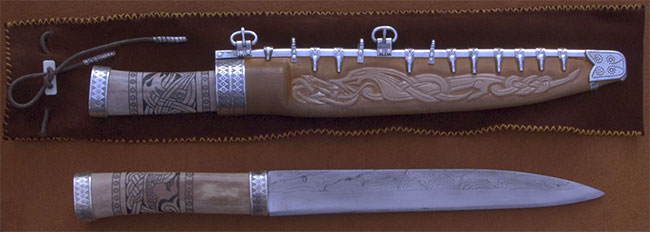
And here is the completed engraving after a final polish to remove my finger marks: -

antler_steel_6.jpg


And now I'm out of firesteel blanks - could be time to start another group buy :eek: when I am under a little less pressure work wise that is :D

Cheers,

Phil.
 

AndyW

Nomad
Nov 12, 2006
400
0
50
Essex
This I like :D

I've actually put bone handles onto a couple of mine and have been mulling over how to get some markings onto it.

Seen a couple of possible methods but this one really does look the best :cool:

I'll post some pics once I've got around to finishing them!
 

Eric_Methven

Bushcrafter (boy, I've got a lot to say!)
Apr 20, 2005
3,600
42
73
Durham City, County Durham
If you want to do some small scale engraving on bone or antler, use a sharp tool (tungston carbide engraver's pen from an auto supplier) and scratch the design onto the chosen material. Then get some beeswax (about half a teaspoon should be plenty) and some charcoal. Grind the charcoal to dust in a pestle and mortar. Soften the beeswax in the microwave for a couple of seconds. Mix the beeswax with the charcoal and knead together. You'll end up with a ball of black wax.

Use the end of a teaspoon as a spatula and push a little bit of the wax into the impression made by the engraving tool. Use the side of the teaspoon handle to scrape any excess of, and you should have a nice black engraving on your shiny antler or bone workpiece. That's a lot more authentic than using modern epoxies or paint.

Eric
 

fredcraft

Nomad
Jan 26, 2007
342
0
42
Quebec
Eric_Methven said:
If you want to do some small scale engraving on bone or antler, use a sharp tool (tungston carbide engraver's pen from an auto supplier) and scratch the design onto the chosen material. Then get some beeswax (about half a teaspoon should be plenty) and some charcoal. Grind the charcoal to dust in a pestle and mortar. Soften the beeswax in the microwave for a couple of seconds. Mix the beeswax with the charcoal and knead together. You'll end up with a ball of black wax.

Use the end of a teaspoon as a spatula and push a little bit of the wax into the impression made by the engraving tool. Use the side of the teaspoon handle to scrape any excess of, and you should have a nice black engraving on your shiny antler or bone workpiece. That's a lot more authentic than using modern epoxies or paint.

Eric

That's a really good trick to know Eric.

Can that technique/mix be used with wood as the engraved material ? I know that pyro engraving (I'm not sure if it's the correct term in english, sorry) gives a similar result, but I was wondering if it could be a viable lasting alternative.

Thanks,
 

Eric_Methven

Bushcrafter (boy, I've got a lot to say!)
Apr 20, 2005
3,600
42
73
Durham City, County Durham
fredcraft said:
That's a really good trick to know Eric.

Can that technique/mix be used with wood as the engraved material ? I know that pyro engraving (I'm not sure if it's the correct term in english, sorry) gives a similar result, but I was wondering if it could be a viable lasting alternative.

Thanks,

I wouldn't recommend it on wood. You have to press really hard to get the wax to penertate the engraved portion, and there's a real chance of the wax pushing into the softer parts of the grain, giving you a ragged edge appearance. Incedentally, using the technique I described in the post above, it's important to make sure the surface you are working on is highly polished before you start the engraving. Small scratches and blemishes will pick up the wax, and once it's in there, you won't get it out. Work on the area to be engraved with 0000 grade wire wool, then go over with a buffing compound until it shines - then do your engraving.

Eric
 
Eric_Methven said:
If you want to do some small scale engraving on bone or antler, use a sharp tool (tungston carbide engraver's pen from an auto supplier) and scratch the design onto the chosen material. Then get some beeswax (about half a teaspoon should be plenty) and some charcoal. Grind the charcoal to dust in a pestle and mortar. Soften the beeswax in the microwave for a couple of seconds. Mix the beeswax with the charcoal and knead together. You'll end up with a ball of black wax.

Use the end of a teaspoon as a spatula and push a little bit of the wax into the impression made by the engraving tool. Use the side of the teaspoon handle to scrape any excess of, and you should have a nice black engraving on your shiny antler or bone workpiece. That's a lot more authentic than using modern epoxies or paint.

Eric

That's a great tip Eric - thanks for the input. ;)

Would that mixture have flush filled a 2mm'ish deep channel and remained in situ - or do you think it would have fallen out in time?

Phil.
 

Eric_Methven

Bushcrafter (boy, I've got a lot to say!)
Apr 20, 2005
3,600
42
73
Durham City, County Durham
Too Much Kit To Carry said:
That's a great tip Eric - thanks for the input. ;)

Would that mixture have flush filled a 2mm'ish deep channel and remained in situ - or do you think it would have fallen out in time?

Phil.

It would have filled it Ok, but whether it would have stayed in situ permanently is another matter. It depends on how much use the handle gets put to. It is much better on thin incised lines like those made with a needle point, or even better on miniscule dots, (pointalism) as used in scrimshaw work.

Eric
 
Eric_Methven said:
It would have filled it Ok, but whether it would have stayed in situ permanently is another matter. It depends on how much use the handle gets put to. It is much better on thin incised lines like those made with a needle point, or even better on miniscule dots, (pointalism) as used in scrimshaw work.

Eric

Right I understand. Think that it would not have fallen out in this case - but it's something I shall try in the future.

thanks Eric.

Phil.
 

BCUK Shop

We have a a number of knives, T-Shirts and other items for sale.

SHOP HERE