Tutorial: An Improved Tarp Tent Shelter Design for Bushcraft Camping

  • Hey Guest, Early bird pricing on the Summer Moot (29th July - 10th August) available until April 6th, we'd love you to come. PLEASE CLICK HERE to early bird price and get more information.
A couple of years ago I posted a simple way to make a shelter from a tarp using a single pole, and without having to tie it off to any trees or solid connection point above. This latter point is useful if you need to make a shelter on ground away from the woods, or for when you have limited cordage.


I read through (with difficulty) David Macpherson's Introduction to Tarp Shelters, but got flummoxed with all of the configurations shown. Then while browsing through BushcraftUK.com, I came across a thread about shelters that at first led me to Pablo's excellent blog posts about shelter, and then finally to NWWoodsman.com, which has a terrific article and video showing off how to set up this tarp tent (video shown at bottom of this post).


There are two improvements I see over my first tarp tent configuration. First of all, this is a closed shelter. The doors keep the warmth in and the wind out. Secondly, the ingenious simplicity of the pole configuration that holds the tarp up opens up and clears the entrance way, allowing for greater freedom entering and while within the shelter.


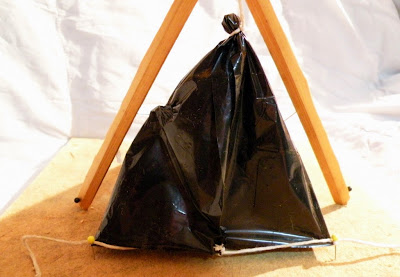
As I am unable to make it outside easily at the moment (our 8-week old baby commands our devoted attention), I have modelled this shelter.


I used a ceiling tile for the ground, kitchen cotton twine for rope, pins for tent stakes, a sheet of garbage bag plastic with the dimensions of 3 X 4 for the tarp, and 2 sticks cut from a piece of trim I found in the basement for the poles that by their very angle can remain free-standing and hold up the tarp.


All that is needed is some method to keep out mosquitoes (depending on local conditions and the season), and a groundsheet on to which I would place my camping mat and sleeping bag (or simply wool blankets).


Now I can transport 2 wool blankets, tarp, and a groundsheet all in a single roll - and without having to carry fibreglass poles, because I can cut a couple of poles using my axe from the woods.


This solution makes for a brilliant, weather-tight lightweight shelter for bushcraft camping.


Have a look at the Woodsman Tarp video, from Northwest Woodsman which provides some clear directions on how to set up this configuration of tarp:

http://www.youtube.com/watch?v=ZzJHuWlEAtk&feature=player_embedded

Let me know about some of your experiences sleeping under a tarp as compared with a tent in the comments below.

Cheers,

Mungo
 
D

DavidW

Guest
Here is a link with pictures of the same nwwoodsman tarp tent set up in alternate ways.

btw- the second picture down on the right side is the same tarp folded as a bed roll. The d-rings are placed such that they can be tied in that configuration too and stay folded. Here's Eric's description of how to do it"

"To set it up as a bedroll lay it out flat and put you bedding in the middle of the canvas. Fold 3' of canvas over the feet until the loops meet and tie them together. Then fold 3' of canvas over the bed which will expose the D-rings on one side. Then fold the other side over so the D-rings and the loops meet, tie them together. That gives 5 layers of canvas around your feet and two over your body that will shed the rain if need be. It also gives 3' of canvas to use over your head."

http://nwwoodsman.com/Product/CampLife/TarpTent.html

As mentioned in a previous post I just ordered one of these tarps , email confirmed it shipped yesterday. Looking forward to trying it out and hoping I find appropriate sized poles to use on site which has been some concern. However, with winter on and the leaves down I've been keeping my eyes on the woods as I drive around and it looks like I might not have to tough a time of finding good poles with out cutting any live trees.

David
 

DavidEnoch

Member
Feb 22, 2007
36
0
64
Dallas, Texas USA
I found that video last weekend and must have watched it a dozen times since then. It seems like magic when he stands it up and a tent comes to shape from that flat tarp. I just ordered this tarp: http://www.sportsmansguide.com/net/cb/cb.aspx?a=254694 from Sportsman's Guide and and hope to try it with that tarp. The Tarp NW Woodsman sells is 9 feet x12 feet and the Sprortsman's Guide tarp is 12 feet x12 feet but it has lots of tie off locations so I hope it will work well for the same setup. I think you could support the top with a rope over a tree and not cut any wood poles at all.

David Enoch

You're right - it was like magic, huh?! So I was thinking that the canvas might be a bit heavy for my requirements, so I'll use my silnylon tarp, but use it in the same configuration.
 
D

DavidW

Guest
A bit off the topic - but the folks at nwwoodsman also have a nice video on how to wrap up in a wool blanket - conveniently filmed in front of the same tarp-tent.

http://www.youtube.com/watch?v=Gx38go8-Ig8

It's also on their website but in a format my computer doesn't play - but the youtube version should work for everyone without having to download any new player software.

His version is , I suppose, the one dog version. :)
 

tommy the cat

Bushcrafter (boy, I've got a lot to say!)
Feb 6, 2007
2,138
1
55
SHROPSHIRE UK
Funny Mungo I had seen that video b4 and will be having a play with some canvas I have!
Like the set up for floor dwelling in winter.
Dave
Ps congrats Mungo on the new(ish) arrival! How's the mut taken it?
 
D

DavidW

Guest
..... The Tarp NW Woodsman sells is 9 feet x12 feet and the Sprortsman's Guide tarp is 12 feet x12 feet but it has lots of tie off locations so I hope it will work well for the same setup. I think you could support the top with a rope over a tree and not cut any wood poles at all.

David Enoch

To do the same tarp-tent set up you may have to add some patches with tie out loops in a couple of places. Once you've folded a 3 foot section under at the foot end you'll have the 9 x12 size .

But will there be loops to peg to the ground at the foot end in the right place? He appears to put the foot end pegs spaced in 3 ft. from the side and then tucks the rear/side corners under. Then 6 foot forward pegs to the ground again at full 12 ft width, allowing for the amount of needed step in for when the tarp is raised. And also at the sides, appropriately placed loops to pull the sides out where he ties them to the poles half way up? the side pull outs would be a little different if hanging the peak from a ridge line and not using poles.

Depends on where the loops are placed as built I would think. Lots of places around on the internet showing how to add a reinforced patch and loop that will be strong enough. One of the slickest ways I've seen is to cut two round patches, sew through both with one inside and one outside. With the outside patch having two small holes melted through , about 1/2 inch apart , centered on the patch. Before sewing it on run a piece of line through the holes to make the loop. 1/8 inch, 1.5mm line ought to work. Or similar patches with sewn through 1/2 webbing loop. However, maybe you'll be fortunate and loops will already be on in the right places. For all the other set up configurations your loops as built ought to make you good to go. Likely more spacious too.

And of course you'll likely want to stay a little further from the fire if you planned on having one near the front opening.
 
D

DavidW

Guest
Opps. forgot , there is also a pull out centered 3 ft forward of the foot end. And centered 6 ft in from each side. That pulls the back end up and open when set up in the tarp-tent configuration as shown in the video.
 

DavidEnoch

Member
Feb 22, 2007
36
0
64
Dallas, Texas USA
One thing I like about this set-up is that it would allow you to use your tarp in a public campground as it provides the necessary privacy. As with most tarp set-ups, mosquito protection is it's weakest link.

I had an 8 foot x 10 foot tarp at home so when I got home Friday evening I got it out and started playing in the back yard. My tarp has grommets every 2 feet around the perimeter. I put my stakes in the back (10' side) two feet in from each corner which left 6' wide inside. I put my front stakes in the side grommet 6' from the back. I had a couple of long pieces of wood 1" x 2" that I used as the crossed poles. My "tent" landed up being 6 feet x 6 feet x about 5 feet tall. My timbers were a little too light and I landed up adding a rope to tie off the poles to the front to keep them tight. I left the tarp tent up all weekend and it withstood pretty heavy winds Saturday. I am 6 feet tall and the the tent was a little too small for me. I could have slept corner to corner but the tarp would still have been right over my face.

I may play with it a little more tonight before I tear it down and see if I can make it a little bigger. One way to make it larger is to put the front stakes in the corner grommets and leave it open in the front.

I am pretty sure that I will have to add extra grommets and patches with loops to the Sportsman's Guide Tarp if I want to make the tarp tent. It appears that the the grommets are spaced too far apart and patches are not in the right place for the tie-offs. Thanks for the instructions on how to do that. I am anxious to see just how much this tarp will weigh.


Have a good week,

David Enoch
 

DavidEnoch

Member
Feb 22, 2007
36
0
64
Dallas, Texas USA
As mentioned in a previous post I just ordered one of these tarps , email confirmed it shipped yesterday. Looking forward to trying it out and hoping I find appropriate sized poles to use on site which has been some concern. However, with winter on and the leaves down I've been keeping my eyes on the woods as I drive around and it looks like I might not have to tough a time of finding good poles with out cutting any live trees.

David

David, did you get your tarp yet? Did it come with any set-up instructions? I am interested on how far apart the stakes are on the sides. In the video, it appears that they are wider apart than the back stakes. Also, how deep is the set-up from front to back and how high is the peak? I am beginning to wonder if the guy in the video is really short.

I tried this set-up yesterday evening with my new 12' x 12' guide gear tarp. Since I didn't have grommets and attachment points in the right places, I used spring clamps to grab the material just to try it out. I was not very successful and could use any additional information you can provide.

I will try to do a review on the Sportsman's Warehouse Guide Gear 12' x 12' tarp soon.

David Enoch
 
D

DavidW

Guest
David, did you get your tarp yet? Did it come with any set-up instructions? I am interested on how far apart the stakes are on the sides. In the video, it appears that they are wider apart than the back stakes. Also, how deep is the set-up from front to back and how high is the peak? I am beginning to wonder if the guy in the video is really short.
...
David Enoch

David,

Not much time this morning to answer your question before heading out to church. Yesterday I set up guy lines on two new hammock tarps and tried out a new speer hammock then went into the woods to find a couple of poles to set up the nwwoodsman tarp for the first time. So I did on get started on my first setup until dusk. As with anything else the first time you do something it doesn't exactly setup a neatly, as tautly as the adverts or the experts make it look.

No setup instructions came with the tarp. Just an email saying to call or email if I have set up questions.

I believe if you look at the youtube video , in the comment section I think you'll find a response from the guy who is in the video and he states he is 6ft 1 inch in height. Some of this I think comes from effects of camera photo focal length. ( remember the Crocodile Hunter with his son. I think a telephoto lens made him look much closer than he was)

I did not measure from front to back depth. But it should be 6 ft with the doors closed and a bit longer with the door open. The tarp is setup with the 12ft length as the left to right dimention and the 9ft dimention from front to back.

I agree it looks like the back pegs are set in from the corners 3 ft. Then it looks like he is peging the side loop at 6 ft forward from the back end. Set in of course from the full 12 ft width of the tarp to allow for when the tarp is raised.

After I got my tarp raised , the front door did not close as it does in the video. So something else to learn. I hope to get a chance to set it up again this afternoon, but depends on what the family wants to do today, after watching the video again. The other thing that surprised me is I found I had to angle the poles with ground end toward the back. This this had to be done to get the side ties outs to be right under the poles. In the video the poles appear to be only tilted in toward the peak but otherwise no tilt toward front or rear.

If I get it figured out today I'll try to post this evening if successful. If I still have problem getting the setup correct I'll have to email or call Eric at nwwoodsman.

Not much help but that's all I know at the moment.

D
 
D

DavidW

Guest
I set the nwwoodsman tarp-tent up again this afternoon and believe I got it setup the same as shown in the youtube video. It looked close and had that nice taut tarp sound when thumped. :)

The tarp is laid out on the ground with the longer dimention being the width and the shorter dimention being front to back. ie 12 ft wide and 9 ft front to back when laying flat on the ground.

At the back edge the 2 ground pegs are inserted at the loop 3 feet in from the corners. On the sides you go forward 6 feet to the loop on either side. Set the loop inward toward the center 3 feet on each side. This results in the forward pegs being directly forward of the 2 pegs at the back. These pegs essentially mark the corners of a 6 ft x 6 ft box.

Then the 2 poles are attached at the center ring at the peak which is when at ground level 3 feet further forward. Then when the 2 poles are raised the but end of the poles are moved a few feet toward the rear of the tarp. Thus the two poles not only angle in from the sides to the peak but also angle forward toward the peak too. The video I think makes it look like the poles come out at a 90 degree angle to the peak. But if that is done then lower down the poles will not be over or directly out from the side tie outs.

Anyway , with the tarp erected correctly - with the doors closed as shown in the video you enclose a floor space which is 6ft x 6 ft. The side pull outs , plus the rear pull out make the walls near to vertical so that most of the floor space is usable. Only the rear corners are not of much use.

The peak height on the inside , just below where the two poles cross over head measures 71 1/2 inches . So just a touch under 6 feet in height. But that height is only in one place and that is directly underneath the area reinforced for the ring which is tied to the poles crossing point. At the rear wall , just below where the ring is attached for the rear pull out , the height above ground is about 28 1/2 inches. Directly below that point measuring along the ground to the rear edge of the tarp measures about 24 inches, 2 ft.

Hope this answers the questions about the interior space of this size tarp set up as shown in the youtube video.

D

Brilliant - nicely described! I hope to set mine up in the backyard soon, but your measurements are reassuring.

Cheers,

Mungo
 

BCUK Shop

We have a a number of knives, T-Shirts and other items for sale.

SHOP HERE