Ive not had a lot of luck with wood burning stoves, nor in fact in my quest for any type of lightweight stove. Come to think of it, apart from the good old Trangia, Ive had no joy with stoves at all.
Ive tried the Pocketcooker (too heavy) and even made my own hobo stove (too big.) Ive also tried combining elements of different stoves like the hexy burner stand, Trangia burner and billy into a Heath Robinson type of cooking unit (too inefficient). What I really want is an all in one efficient, reasonable small (fit inside 12cm or 14 cm billy) lightweight unit with a wood burning stove as a base but capable of being adapted for other fuels that I can use for all occasions. Not much to ask eh?
I spotted the Bushbuddy at the Bucks meet and thought this might be the answer. I ordered one and it duly arrived last week. Herewith, an initial review.
The Bushbuddy comes in two versions; the standard version and an ultra-light version. According to the maker, Fritz Handel from Bushbuddy, Canada, its an improved version of the Trekstov. I elected to go for the standard version which weighs in at 6 oz.
The dimensions are 4 ¼ inches diameter and 3 ¾ inches high when nested. The stand part fits snugly into the burner unit. You can add another couple of inches when the stand is placed on top of the burner unit. It is surprisingly stable even though there are no physical clips to connect the two parts of the unit. The unit is made of 18% chromium and 8% nickel and the grate is nichrome wire. All this means nothing to me but it may to you. Roughly translated I guess it means its designed to last.
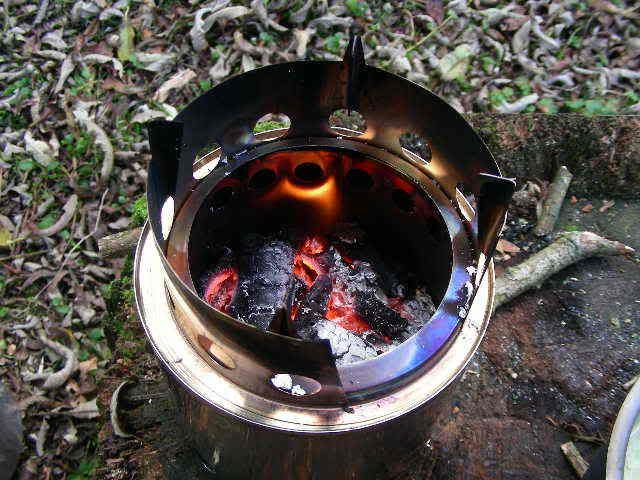
The most unique difference between this and other stoves is that its double skinned. This gives the stove an opportunity to preheat secondary combustion air making it clean burning and efficient. There are vent holes at the bottom of the outer skin and at the top of the inner skin.
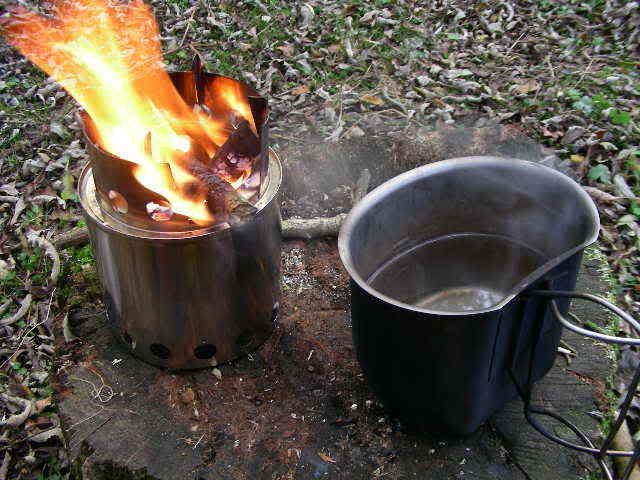
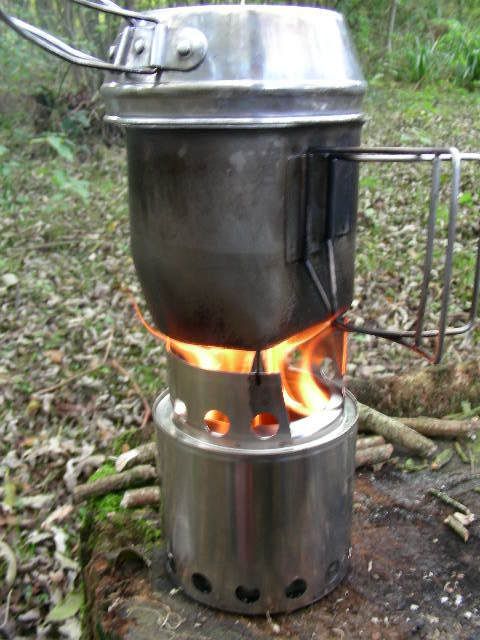
The first time I used the unit, the birch bark ignited flame went out in my over-enthusiasm to load in the small twigs, but amazingly, I blew it back into life. The second time I had no problem at all firing up the unit by adding small twigs and gradually working up to finger length and thicker wood. Once the billy (or even crusader cup) was fitted to the top of the stove, wood can be fed through the gap created between the stove and the stand. This is less fiddly than it sounds.
Because of the low profile of the unit, the whole thing is pretty stable, but I would be aware of uneven ground when using the stand. An option would be a wooden dangler of course. Because of the double skin, theres no scalding of the ground in fact you can move the unit by placing fingers at the very bottom of the stove. Err dont do this when youve got boiling water on the go. Did I need to say that? Yes, I probably did!
My highly scientific test involved boiling half a litre of water in a covered crusader cup. There was no wind and the temperature was about 10 degrees C. Not exactly testing conditions, but suitable for a first go. After three minutes the stove was hot enough to put the water on. After 8 minutes, I had a rolling boil. Now thats not bad. Of course, things may be different in more adverse conditions, and Ill certainly let you know how I get on during the winter.
Fritz does admit that the stove isnt so efficient in windy conditions; therefore, its worth spending some time finding a sheltered location. I might just get myself a wind shield.
Obviously with wood stoves, its not that easy to regulate the heat. As already mentioned a wood dangler might be the solution, but it's also worth experimenting with how much wood you feed the stove; for example adding a single larger piece of wood for simmering. I very quickly got used to this and ended up making a full English breakfast without any sign of blackening, burning, sticking or barbeque syndrome (outside cooked inside cold). The instructions enclosed with the unit described some of these techniques which will be handy to the wood burning stove novice.
Its easy to rave about a new product that is brand new and still all but shiny, but I think that my Bushbuddy and I are going to get along fine.
My final test was to drop the civilian Trangia burner inside. This was part of my own specification for an all in one portable cooking solution. It fitted a treat. Perhaps there might be a requirement to rest the burner on the lid for optimum height, but I can probably live with that.
How much? Yeah, well its not cheap. 100 Canadian dollars. Thats might be acceptable if you live in Canada. If you live in UK, you have to consider running the gauntlet of the VAT man, import tax and Royal Snail Mail handling charges. You have to buy it directly from Bushbuddy.ca as there are no UK suppliers.
What you get is great support including personal emails from Fritz which is very refreshing and a great product. He packed and dispatched it the day after I ordered it and warned me of the possible length of time it would take to arrive.
Now, all I have to do now is tell Mrs Pablo that Ive got a new Bushbuddy. I bet shell say, Who is she then?
There's a video of the review on my blog.
Pablo.
Ive tried the Pocketcooker (too heavy) and even made my own hobo stove (too big.) Ive also tried combining elements of different stoves like the hexy burner stand, Trangia burner and billy into a Heath Robinson type of cooking unit (too inefficient). What I really want is an all in one efficient, reasonable small (fit inside 12cm or 14 cm billy) lightweight unit with a wood burning stove as a base but capable of being adapted for other fuels that I can use for all occasions. Not much to ask eh?
I spotted the Bushbuddy at the Bucks meet and thought this might be the answer. I ordered one and it duly arrived last week. Herewith, an initial review.
The Bushbuddy comes in two versions; the standard version and an ultra-light version. According to the maker, Fritz Handel from Bushbuddy, Canada, its an improved version of the Trekstov. I elected to go for the standard version which weighs in at 6 oz.
The dimensions are 4 ¼ inches diameter and 3 ¾ inches high when nested. The stand part fits snugly into the burner unit. You can add another couple of inches when the stand is placed on top of the burner unit. It is surprisingly stable even though there are no physical clips to connect the two parts of the unit. The unit is made of 18% chromium and 8% nickel and the grate is nichrome wire. All this means nothing to me but it may to you. Roughly translated I guess it means its designed to last.
The most unique difference between this and other stoves is that its double skinned. This gives the stove an opportunity to preheat secondary combustion air making it clean burning and efficient. There are vent holes at the bottom of the outer skin and at the top of the inner skin.
The first time I used the unit, the birch bark ignited flame went out in my over-enthusiasm to load in the small twigs, but amazingly, I blew it back into life. The second time I had no problem at all firing up the unit by adding small twigs and gradually working up to finger length and thicker wood. Once the billy (or even crusader cup) was fitted to the top of the stove, wood can be fed through the gap created between the stove and the stand. This is less fiddly than it sounds.
Because of the low profile of the unit, the whole thing is pretty stable, but I would be aware of uneven ground when using the stand. An option would be a wooden dangler of course. Because of the double skin, theres no scalding of the ground in fact you can move the unit by placing fingers at the very bottom of the stove. Err dont do this when youve got boiling water on the go. Did I need to say that? Yes, I probably did!
My highly scientific test involved boiling half a litre of water in a covered crusader cup. There was no wind and the temperature was about 10 degrees C. Not exactly testing conditions, but suitable for a first go. After three minutes the stove was hot enough to put the water on. After 8 minutes, I had a rolling boil. Now thats not bad. Of course, things may be different in more adverse conditions, and Ill certainly let you know how I get on during the winter.
Fritz does admit that the stove isnt so efficient in windy conditions; therefore, its worth spending some time finding a sheltered location. I might just get myself a wind shield.
Obviously with wood stoves, its not that easy to regulate the heat. As already mentioned a wood dangler might be the solution, but it's also worth experimenting with how much wood you feed the stove; for example adding a single larger piece of wood for simmering. I very quickly got used to this and ended up making a full English breakfast without any sign of blackening, burning, sticking or barbeque syndrome (outside cooked inside cold). The instructions enclosed with the unit described some of these techniques which will be handy to the wood burning stove novice.
Its easy to rave about a new product that is brand new and still all but shiny, but I think that my Bushbuddy and I are going to get along fine.
My final test was to drop the civilian Trangia burner inside. This was part of my own specification for an all in one portable cooking solution. It fitted a treat. Perhaps there might be a requirement to rest the burner on the lid for optimum height, but I can probably live with that.
How much? Yeah, well its not cheap. 100 Canadian dollars. Thats might be acceptable if you live in Canada. If you live in UK, you have to consider running the gauntlet of the VAT man, import tax and Royal Snail Mail handling charges. You have to buy it directly from Bushbuddy.ca as there are no UK suppliers.
What you get is great support including personal emails from Fritz which is very refreshing and a great product. He packed and dispatched it the day after I ordered it and warned me of the possible length of time it would take to arrive.
Now, all I have to do now is tell Mrs Pablo that Ive got a new Bushbuddy. I bet shell say, Who is she then?
There's a video of the review on my blog.
Pablo.
")