DIY Hex Tarp

  • Hey Guest, Early bird pricing on the Summer Moot (29th July - 10th August) available until April 6th, we'd love you to come. PLEASE CLICK HERE to early bird price and get more information.
Aug 4, 2013
866
3
Berkshire
This is really cool.

I do have an admission to make. I spent a lot of time yesterday looking at the diagram and your photos and I just couldn't get it.

Then I realised that you need a piece like your diagram and it's mirror image to make the finished article. It was so obvious and I felt so stupid.
 

Philster

Settler
Jun 8, 2014
681
40
Poole, Dorset
Thanks Gents!
Yes, the dimensioned drawing shows half a tarp - glad you clicked! If you can get two pieces then you need just one seam to complete the tarp. You can make it from six separate pieces but you then have much more sewing to do and more opportunities to make a mistake - anything that increases the chance of a good result is a winner in my book. You also have less seam sealing to do to guarantee it drip proof :)
Cheers
Phil
 

OurAmericanCousin

Tenderfoot
Feb 7, 2015
99
0
SoCalUSA
Exceptionally clever. It's not often that a completely new design emerges in a saturated market. You should be very proud of yourself and strongly consider patenting your design before someone else does.
 

ebt.

Nomad
Mar 20, 2012
262
0
Brighton, UK
Hi Phil,

Im trying to work out the storm flap. Am i right in thinking its pinned down at two points on the back right, comes over the top and pins down at on point on the front left?
 

Philster

Settler
Jun 8, 2014
681
40
Poole, Dorset
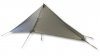
Ebt - it's pegged out on the right corner and at the front of pic. Where it folds over the guy line at the top edge I have another point where I have attached it to the top of the pole with a carabina and a short piece of paracord. Then the open side of the flap has 3mm shock cord attached to the end, pinned out on the peg on the left of the entrance. I found the storm flap to be a tough one to figure out as you can fold a piece of material up so it fits but when you start to tension it the shape needs to change a little. Experimentation is definitely recommended and some offcuts of polythene mean you can have a few attempts to get it right before you start with your precious material :)
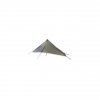
In all honesty I don't think the storm flap is going to be essential - I designed it so that you have 800mm of width behind the pole to lie down in (which is plenty wide). That gives you 1 meter of cover from the pole to the front edges of the tarp. If you set up with your back to the wind you will be dry if the wind changes direction by 90 degrees - if the wind completely changes directions and blows into the front of the tarp there still a lot of overhang to keep you dry. I considered bringing the "beak" of the entrance down lower but it is a trade off between easily getting in and out and the amount of protection you want. I like to see about a bit when I'm lying down - I'm used to having a regular tarp above me. But this design gives you a lot of cover while still giving you a good view :) I didn't particularly want it to become a "tent".
Hope this makes sense,
Phil
 

widu13

Bushcrafter (boy, I've got a lot to say!)
Feb 9, 2008
2,334
19
Ubique Quo Fas Et Gloria Ducunt
lair1_main.jpg

http://www.bearpawwd.com/tents_tarps/lair.html


plus_door_l.jpg


http://www.zpacks.com/shelter/hexamid_plus.shtml
 
Last edited:

Jack Bounder

Nomad
Dec 7, 2014
479
1
Dorset
<deleted>
Jack - the material is very nice, strong without being too heavy. It would make a perfect traditional tarp!
I now have the material and am quite pleased with it. I'll be making the tarps soon and will record my attempts in a thread (after I have made the camo smocks for the kids Clicky).
 

BCUK Shop

We have a a number of knives, T-Shirts and other items for sale.

SHOP HERE