Wood-gas stove for developing countries

  • Hey Guest, Early bird pricing on the Summer Moot (29th July - 10th August) available until April 6th, we'd love you to come. PLEASE CLICK HERE to early bird price and get more information.

Elines

Full Member
Oct 4, 2008
1,590
1
Leicestershire
Following up on Stanleythecats 'Home made tin can stoves;' thread

I came across this paper:

'A wood gas stove for developing countries' at

http://www.waoline.com/science/newenergy/BioEnergy/Links/WoodGasStove.pdf

As somebody seems to have spent some time working on a good design I thought I would have a go at making one and have actually found a suitable tin (often the most difficult part it seems to me).

But I can' t actually find one that has actually been made on the internet generally, the Biomass Energy Foundation website (where the authors of the paper came from or this site.

The schematic of the stove is:

stove.jpg


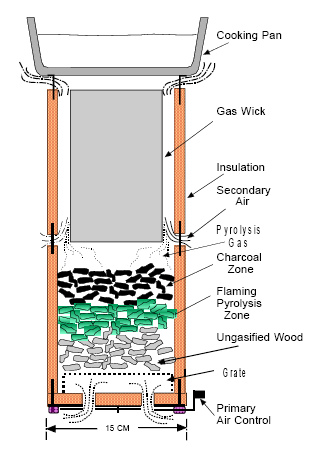
and is pretty full. (The dimensions of the holes in the bottom and the 'Primary air control' are given separately in the paper.)

The main thing that I can think of that is missing is the size of the holes in the side - about half way up. As my general reading up on wood gas stoves suggests that size of holes can be crucial I was wondering if anyone has actually made one of these or can otherwise advise on size of these holes?

Also has anybody made one which includes the insulation? And if so what did they use?
 

shaggystu

Bushcrafter (boy, I've got a lot to say!)
Nov 10, 2003
4,345
33
Derbyshire
this is the one that i made a while ago chris:
b5kx77.jpg


dis-assembled:
357q0k2.jpg


don't know if that helps at all

stuart
 

ged

Bushcrafter (boy, I've got a lot to say!)
Jul 16, 2009
4,979
14
In the woods if possible.
You're going to have to get a workshop next, Chris. :)

Do you mean the hole marked "secondary air"? If so, from what I remember of that design (at least a decade ago) it's an annular gap between two cans, not a row of holes in one can. That means it's just a matter of adjusting the spacers to get the best combustion, which is a lot easier than adjusting hole sizes. It also gives better gas mixing.

I haven't made one to that pattern, but I gather that the insulation is very important. It helps to get the gas hot enough for efficient combustion, like the 'Rocket' stoves. Any fired clay product should do the job, flue liners, a flower pot with the bottom removed, or you could make something yourself with Plaster of Paris or the clay that they let you loose with at primary school. When I was about five I made a fish which I think my sister threw out last year. Make sure it's well dried before lighting up or it might explode. There are numerous heat-resistant building and plumbing materials that you might try, even fibreglass wadding or something like perlite would work if you had an inner as well as an outer can.

Apart from the insulation crumbling, the main problem I foresee with the materials used in the design is the longevity of thin steel cans. If you go to as much trouble as that to make the stove you want it to last a good while, and in my experience the average tin can will only last a few days if it's subjected to high temperatures continually. Stainless lasts a lot longer but is much harder to come by in random shapes and sizes.

If I were going to make something like this I think I'd make it bigger. The problem with these designs is feeding them to keep them going, so the bigger the charge the long they'll run.

HTH.
 

Elines

Full Member
Oct 4, 2008
1,590
1
Leicestershire
Thanks for the feedback/comments so far - I guess no-one has actually made one to the actual design?


this is the one that i made a while ago chris:


dis-assembled:
357q0k2.jpg


don't know if that helps at all

stuart

Thanks Stu - yes - I came across it earlier today when I was searching to see if anyone had made the design I am thinking of doing. Without knowing how it worked/dimension of cans/holes I was reluctant to give it a go


You're going to have to get a workshop next, Chris. :)

Do you mean the hole marked "secondary air"? If so, from what I remember of that design (at least a decade ago) it's an annular gap between two cans, not a row of holes in one can. That means it's just a matter of adjusting the spacers to get the best combustion, which is a lot easier than adjusting hole sizes. It also gives better gas mixing.

............................ fibreglass wadding or something like perlite would work if you had an inner as well as an outer can.

Apart from the insulation crumbling, the main problem I foresee with the materials used in the design is the longevity of thin steel cans. ............................. in my experience the average tin can will only last a few days if it's subjected to high temperatures continually. Stainless lasts a lot longer but is much harder to come by in random shapes and sizes.

If I were going to make something like this I think I'd make it bigger. The problem with these designs is feeding them to keep them going, so the bigger the charge the long they'll run.

HTH.

Yes it was the 'secondary air'. Being a continuous ring of space means that I could use two identical cans rather than one tall can that I then have to cut in half

I think the fibre glass wadding would be the way to go for me - probably surrounded by radiator-foil-backed foam insulation

Mmmm the bit on longevity is a problem and it makes sense - have to think about that. As it is all for the experince/a bit of (unoffical) fun then I may end up giving it a go to see what happens

Have you come across this Chris?

http://www.journeytoforever.org/at_woodfire.html

Can't see a link there just now but I think the paper you've referenced was linked there at one time.

Yes - had seen it as part of my search - the link is about halfway down the page. I didn't read it all because it looked technical and I was looking for simpleton instructions

Re a workshkop - my father-in-law died a few years ago and - at the request of his wife - I started going through his shed only yesterday. It's full of taps and dies and other stuff I have even less clue about - he was an engineer - as in metals and electrics. He actually had an early involvement with Sobel (?) TVs and also the developmentof radar so shame he is no longer with us or he would be a big help with this stuff. And as he rather gave up towards the end it would have been good for him too. Anyway I have probably got the makngs of a good 'metal' workshop - have to go to a metal working evening class if they provide such things
 

shaggystu

Bushcrafter (boy, I've got a lot to say!)
Nov 10, 2003
4,345
33
Derbyshire
How well does it work Stuart? Have you done a review? :)

it works pretty well i reckon, but, i've only made the one and never had my hands on a commercial version so don't really have a great deal to compare it to. i've not written a review but i do have some notes somewhere from when i was trying the thing out, i'll see if i can find them out. IIRC some of the stats were quite impressive (or at least they impressed me anyway), approx half hour burn times from one fill with a half litre of water sitting at a rolling boil for over half of that time, i don't think i weighed the amount of fuel i was using but it would've been a bean tin full of softwood off-cuts when i was getting those stats, these things are really fuel efficient. fuel efficiency is obviously a great plus point but the downside is how much that fuel has to be processed, for my stove the fuel all needs to be dry, about an inch long and about pencil thick, it also needs to be packed into the stove fairly carefully. the great advantage for me is that all that processing and packing can be done beforehand so that when i arrive at a campsite i can light my stove and put some water on and so long as it takes me less than half an hour to set up i'll have a hot drink waiting for me once i've made camp. similarly i can fill the stove up at night and put a brew on whilst i'm wandering around in my usual state of morning confusion and have hot water ready by the time i've actually woken up. a lot of people state that the downside to these stoves is that you can't re-fuel them once they've been lit, well you can, they just smoke a bit if you do and work less efficiently than if they're used as intended.

HTH

stuart
 

slammer187

Nomad
Jul 11, 2009
411
0
Ireland
I made one a few years ago, works well....instead of insulation I used a second tin to increase the Venturi effect.

[video=youtube;6A_da97TGTU]http://www.youtube.com/watch?v=6A_da97TGTU[/video]
 

Elines

Full Member
Oct 4, 2008
1,590
1
Leicestershire
I made one a few years ago, works well....instead of insulation I used a second tin to increase the Venturi effect.

[video=youtube;6A_da97TGTU]http://www.youtube.com/watch?v=6A_da97TGTU[/video]

Ahhh - so it's you!!

As part of following up on Stanleythecat's original thread I watched all of your videos on the wood gas stove.

The first one was exceptionally clear and your use of photos instead of a normal video I thought worked really well.

http://www.youtube.com/watch?v=jQyJQb8fe_g

The main problem was that you didn't explain how the third can was constructed and used - that was why I watched the other vids to see if you explained it there - but I couldn't see that you did. I eventually worked it out and later realised that there was a glimpse of it, in the video, when not in use at about 7.05 minutes.

(My conclusion was that you removed the top off the can, turned it upside down, drilled four holes in it at the bottom at the 90 degree points, stuck two bits of wire through and then rested it on the top of the stove, inserting the (thrid ) can in the stove as a gas wick. If I am right then this is very simple - it's just that it wasn't obvious.)

I particulary liked the way you explained how to get a good fit when fitting the first two cans together.
 

BCUK Shop

We have a a number of knives, T-Shirts and other items for sale.

SHOP HERE