Review
By Craig Johnson

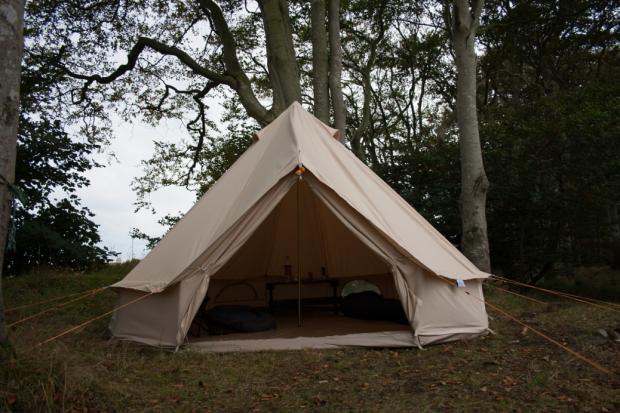
I have always liked the look of the “traditional” style bell tents. They fit perfectly with my idea of a family/group shelter that allows you to have plenty of room to work/sleep in but at the same time, with the addition of a stove, gives you a warm and comfortable area to retreat to when the weather is inclement. Over the past couple of months, I have been out and using one of the canvas bell tents from SoulPad. It has certainly been strange of late where the weather is concerned but this has allowed me to use the tent in a range of conditions.
SoulPad:

SoulPad are a small family run company based down in Norfolk and have been in business since 2006. They make and sell a range of canvas bell tents and accessories to go with them. They have a good reputation and I personally have found them to be very friendly and helpful.
SoulPad 4000-hybrid-G:

The tent I am reviewing here is the 4000-hybrid-G. This is one of the medium bell tents (although still big) and is a cross between the luxury and lightweight ranges. Its size puts it in the class of the touring tents.
Specs:
Metric Imperial
Floor diameter Ø 400 cm 13′
Centre height 250 cm 8′ 2″
Vertical wall height 60 cm 2′
Entrance height 140 cm 4′ 6″
Central pole Ø 2.5 cm 1″
A-frame pole Ø 2.2 cm 0.9″
Total weight 23.4 kg 51.59 lbs.
Main bag dimensions 102 x 31 x 31 cm 40.2 x 12.2 x 12.2″
Canvas weight 285g m² 10.05 ounces
EU Classification: (type T)
Construction:
The body of the tent is made up of four main parts, which are the roof, walls, door and ground sheet. Supporting the whole structure is the central pole and the A-frame for the door, and holding everything down and in place are the ties, pegs and guy lines.
My first impression when I unpacked everything was that all the components were strong and durable looking; I didn’t find any faults and all the parts were there.
The roof:

Thirteen triangular sections of canvas make up the roof, eleven of which measure 39” wide at the bottom tapering up to almost a point at the top; these are joined to the wall. The other two sections are slightly wider at 52” they are shaped and attached to the door panels. All of the sections have had the edges folded over for neatness and have been joined with a double row of stitching.
In the centre both on the outside and inside there is a circle of canvas. These extra layers create a thick pad for the central pole to sit on. This is a needed addition, as not only does it help you situate the pole centrally it also and more importantly stops the pole putting point stress on any particular area of the canvas and on the seams. It also adds strength to the area where all the roof sections meet. So far, I have had no trouble with any of the roof seams coming apart when the tent is under tension.

On the bottom edge of the roof, sections there are 13 loops positioned at the joins of the roof panels. They measure 1”x 1 ¾” and have guy ropes attached to them. These guy lines can be tightened via the slide tensioners on them, they provide excellent anchorage for the roof.
The walls:

The walls are made from nine panels of canvas. Six, which measure 36”x 18” and three that are 72”x 18”. The top edges of the panels are attached to the roof and the bottom edges are attached to one-half of the zippers that holds the ground sheet.
A 4” lip is created over the top of the wall. As it is not attached directly to the roof section edges but 4” up from the bottom on the outside. This lip is important as it sheds any run off from the roof away from the walls. Again, the edges of the sections are folded and have been sewn with a double row of stitching and there have been no problems with the seams.

Attached to the bottom of the wall are 13 loops of canvas. These are doubled over for strength and measure just under an inch and are 3” long. The tabs are used to peg down the walls when they are not rolled up and gives tension to the tent.
The walls give the tent extra height and space and in my opinion gives it an edge over tents that just have the roof coming straight to the floor.

The wall of this tent has an optional use and that is that you can roll it up all the way around. This opens up the whole tent, which is a fantastic feature indeed.
On hot days, you can roll it up, enjoy the breeze, and allow the tent to air out. It also means you have a 360-degree field of vision allowing you to see all that is happening around you. I have enjoyed many hours just sitting and watching things whilst the wall was up. Even when it started drizzling, it was no problem as I was still protected by the roof.
To have the tent open you simply undo the three zips and rollup the canvas. This is then secured by feeding the ties on the inside of the tent through a loop on the outside and the back through the O rings that are situated just above the walls. These hold them securely but are easy to do up and untighten.
One of my few problems with the tent is the zips. Although they are strong and sewn on securely, taking them off and re attaching them can get be a nuisance. Sometimes they are stiff and you have to have a struggle with them, other times I have had to loosen the tension of the tent slightly to be able to get them done up again..
However the more you do it, the easier it gets and the positives far outweigh the negatives and I think it is worth it.
Groundsheet:

The SoulPads are supplied with one of three different types of ground sheet. These are:
(PIG) pegged in ground sheet
(SIG) sewn in ground sheet
(ZIG) zipped in groundsheet
The groundsheet supplied with this tent is the bathtub style, zipped in version. Made from three sheets of extra thick (540g/m2) PVC that have been heat sealed together. It covers an area of 13ft in diameter. Sewn on to the top edge you have the other halves of the three zips that hold the ground sheet and walls together. To hold it down and in place there are 13 tabs spaced evenly around the bottom. These are from strips of the same material used to make the groundsheet. They have either been heat sealed or glued on. In the middle of these tabs, there is a large eyelet.
The first time I saw the ground sheet I could tell it was tough just by the feel of it. After a good few uses now, my first impressions have been confirmed. I have pitched the SoulPad in woodland areas where there has been lots of debris on the ground. No matter how much you try and clear the space underneath there always seems to be a few bits of twig or a couple of beech nuts that have managed to sneak their way back under and I have only noticed them when everything has been set up. I have not yet had anything pierce or make an indentation in the bottom. I am very confident that it will last a long time.
As well as being tough, it is also waterproof. As it is a bathtub style sheet, even if the tent is sitting in a few inches of water it still does not come through. To keep any water from getting through the actual zip there is a 2” canvas storm flap. This covers the entire circumference of the tent.
The weakest part is obviously the seams but they have been sealed together well and there has not been the slightest sign of water coming up through them.
Another plus is the ease in which you can keep the groundsheet clean. For me personally this is no small thing especially when I am camping in places where you bring a lot of dirt etc. into the tent. As it is made of PVC, it is quick and simple to sweep and wipe anything up. Doing this every time I pack up the tent will help prevent any dirt getting onto the canvas when it is folded up.
Although the groundsheet is not a replacement for any kind of mat, it does add a degree of comfort and insulation. When we were using it in the snow, you could still feel the cold but it was not freezing.

The purpose of the ZIG groundsheet is that you can unzip it from the rest of the tent. Having this option is ideal for a number of situations. If you are looking to save a bit of weight, taking it off will certainly save you a few pounds.
It’s also great for those warmer months when all you need is a bit of shelter over your head but still want to be directly on the ground/grass.
I know that for me it will be handy for doing any demos when it is dry. It will be far quicker and easier to set up and carry without it.
I love this groundsheet. It is made to a high standard and although heavier, I prefer it to some of the ones you can buy for other types of tents.
Door:

The door is made up with two triangular shaped sections of canvas that are sewn on to both the roof and wall. Each flap measures approximately 51”X 35” so it gives you plenty of room to get in and out of when both are fully open. This is good in hot weather when you want to let in as much air and light as possible.
In cold or bad weather, I normally just use one side and leave the other closed. I still have plenty of room to get in and out of but you let less heat out.

The door is opened and shut with a couple of strong zips. The main centre zip that holds the two door edges together and the lower two zip the bottom door edges to the ground sheet.
I have not had any problems with these zips. They run smoothly and do not catch. They are also big enough and are easy to grab hold.
On the outside, sewn on to the left hand door flap there is a baffle. This is 2” wide and covers the zip. It is held in place with 2 Velcro tabs. Having this does make a big difference as it stops wind and water getting through the zip.
Vents:

Cut high up into three of the roof panels there are three vents. These are necessary especially in a tent where you would be using some sort of stove and/or doing cooking in. They are large enough to allow plenty of fresh air in/ bad air out, but not so big that it makes it cold inside due to a draught.
On the inside, you have the fine mesh panels these measure approx. 15”x7” and are sewn onto the canvas. On the outside, there is a “Hood” of canvas covering each panel. These are larger measuring 20”x 13”. They have a 1” strip of stiff material sewn into the bottom of them, this allows the canvas to protect the mesh from the elements but not close the panels off.
Windows:

Another fantastic feature on the SoulPad is the four windows set into the walls. Again, these are perfect for on warm days when you want to let fresh air in or if you just, want to air the tent out. If you are lying down and want to see out it is simple to undo the cover and have plenty of area to view. They are also great for letting extra light from outside.
The windows are semi-circular in shape and measure 25”x 12” at its tallest point. On the outside, you have the mesh panel sewn into the canvas. The mesh is strong but fine and won’t allow any insects in.
On the inside, there is the canvas cover this allows you to close the window. It is the same size and you open and close it via a zip that is sewn on around the edge. When open you can keep the canvas cover tidy by tying it up with the ties that are sewn in just below the window.
The Genie:

The Genie is an optional extra that you can get when purchasing certain SoulPads or get retrofitted to an existing one.
It is a special section that is used in conjunction with the stove. It allows you to seal closed the hole made when installing the flue kit. If you do not intend to use your stove on a particular trip you can seal the SoulPad up with the canvas flap instead of having to use a back plate. It is an easy way to make sure that the tent is properly sealed and even if you want to use a back plate and forget it you are not left with a hole.

It is made from three layers:
The inner layer is a square of canvas that has a hole cut out of it. The edges then have been reinforced. This gives you a guide when installing the collar and back plate.
The middle layer is blank canvas that is cut in line with the back plate.
The outer layer is the square cover flap this is what seals up the tent when the stove is not in use. It is held shut with strips of strong Velcro that run along three of the edges. When the stove is in use this flap is rolled up and held with two toggles.
The poles:
Centre pole

Holding the whole structure up is the central pole. This is made up from three sections of 1mm thick plated tubular steel. Each of the three parts measures approx. 34” long and 3 ¼” in circumference. The pole has an overall length of 100”. The top 2” of each pole has been chamfered to allow it to slide easily into the bottom of the next section. All three are held together with a spring that is attached on the inside. This allows you to take the pole down but still have them attached to one another.
The top section has a ring of steel welded to it about 22” up. This is for holding up an inner tent that you can get for the SoulPads. I have found it perfect for hanging torches, lanterns, spare gear, jackets and all manner of bits and bobs. As it is high up it keeps them out of the way.
Both ends are capped with a thick shaped rubber foot. These stop the pole ends from damaging the groundsheet and the canvas.
When putting the pole together you notice that there is a slight bit of movement at the joints. I was a little bit concerned with this first pitched the tent. As soon as you install the pole and raise the roof, this movement is eliminated and the pole sits in place securely.
It is easy to put in place. You just assemble and place the top foot in the centre of the canvas disc in the roof and walk the pole in while lifting at the same time. This is where the main tension comes into play. To get the pole straight and in for the last foot or so you have to push hard. Once in place, it will not budge unless it gets a heavy knock.
I haven’t noticed any signs of weakness or bends in the pole and I am sure that it will be very durable.
The A frame:

The A frame holds the door and joining roof sections up and in place, giving you a lot more room and stability to the tent. Again, it is made from the same plated steel and comes in seven sections. Six of these are straightforward tubular lengths measuring 28” long and 2 ½” in circumference. The seventh section is the top connector. This is bent to almost to 90 degrees and gives the A frame its shape. As with the central pole all, the parts are joined with springs. The top edges also have the chamfered ends and the two end poles have little plastic covers on them.
When assembled the A frame stands at approx. 61”to the top allowing plenty of headroom to get in and out of the door.
It is also easy to install. You assemble it inside the tent and then insert the prong on the bend section into a corresponding eyelet in the canvas. Again, you walk the frame into place; this lifts the canvas creating a porch like area.

To secure the frame in place there are two tabs of webbing sewn into the ground sheet. The feet of the A frame are then placed inside these and it stops the frame from sliding out. There are also a few ties on the canvas that you can use to secure the poles.
To stop any water leaking in where the prong comes through the eyelet there is a tight fitting plastic cap that fits over the prong and covers the hole.
Having the A frame really improves the structure of the tent and the extra room it adds is always a welcome bonus.
Carry Bag:

The whole kit comes inside its own cotton canvas carry bag. The dimensions of the bag are 40.2 x 12.2 x 12.2. Now I find this to be a generous size as you can get the tent packed into it without having to fight it in. The handles are made from 1” webbing and are stitched on around the entire bag. The top can be cinched shut with the draw cord. Sewn on to the inside there is a 12”x12” piece of canvas. Now this gives a little bit of extra protection to the contents of the bag but I reckon it will make great repair patches should I ever need one.
The large size of the bag means that you can store plenty of things inside it when the tent is in use. I fill it with my spare clothes and my jacket and use it as a pillow. It is very strong and robust and I do not see myself having to worry about it ripping apart like some do.
Pegs:
You get a bag of peg supplied with the SoulPad 26 pin pegs for holding down the ground sheet and walls and 13 stake pegs for your guy lines.
They are not the strongest of pegs, I have had a few of both types bend on me but they are good enough and the stake pegs hold into the ground really well.
Setting up and packing away:

One of the things I was concerned about was that I would struggle to put the SoulPad up when on my own due to its size. However, I had nothing to worry about, I just followed the clear instructions supplied and did it easily myself. Once you have done it a couple of times you get quicker at it and better at setting the tension.
The first time I put it up took the longest around 30 min as I was unsure of how much tension to use and I kept taking things out and doing it again to make sure I was on the right track. Now I can put it up on my own easily within 10 min.
To set the tent up you unfold it situating the door away from the wind. Next is to peg down the ground sheet, this is done in a specific order so that you get the tautness even. Then it is lightly pegging the loops attached to the walls. You then have to assemble the centre pole and raise the tent making sure it is central and straight. The A frame for the door is next this is put in place and secured. Finally, you can push the wall pegs in securely and tighten the guy lines. This adds the tension to the whole structure.
To pack away you reverse the order making sure it is clean and dry before putting away.
In use:
Warm weather:
When it is bright outside the canvas lets in a great amount of light. This has the effect of making the inside feel a lot larger and I find that it creates a peaceful atmosphere especially when I am lying back watching the shadows from the trees dance on the canvas.
The tent seems to hold the heat in very well. If I get to warm I can either open the doors and/or windows or roll up the wall and let in any breeze. I know many people only like camping out when it is warm and dry and with its ability to open right up you cannot go wrong here.
Wind:
I live near to the coast in open countryside and it gets very windy up here. I have purposely gone out when it been windy and pitched the SoulPad.
In light to moderate winds, I have had no real problem with pitching up. I think that as the canvas is heavy it help to keep it from flapping about too much. In higher winds it starts to get tricky setting up on your own. You need to make sure the ground sheet and wall tabs are thoroughly pegged down because as soon as you start to raise the tent the stronger winds will buffet it and it’s a bit harder to get the pole into position. Once the tent is up and everything is secured there is little to no movement. I would strongly suggest that if you have to pitch up in these higher winds it is advisable to have somebody with you and possibly wait for a lull.
The canvas acts as a great wind barrier and although it makes it colder, the wind does not penetrate through. I have gone out after a few hours to check on things and have only had to tighten the guys lines up slightly. Apart from that, the only other problem I have found in windy conditions is the zips on the windows clink together. A night of this clinking can get irritating and you have either to pull the zippers apart slightly or wrap a bit of electric tape around the zip pulls, which works for me.
Rain:
Now this was the main test for me, as my biggest worry was that as soon as it started pouring down there would be water leaking in everywhere.
SoulPad suggest that if you are going to camp when there is a chance of a lot of rain it is a good idea to “weather” the tent beforehand. This involves setting up your tent and chucking water on it and letting it dry out. Doing this causes the threads to swell up and after a couple of times it is hard for the water drops to penetrate through. What I did was to take the tent out when it was drizzling and let it “weather” that way. The canvas comes treated with some sort of waterproofing agent that helps in making it resistant to water.

The first few times I went out in drizzle to- light rain and you can see that most of the water just beads and runs off. After a good few hours of the constant drizzle, the tent looks like it was absorbing more of the water. The very first time I would say that the inside only ever got damp, even after a long time of wet weather. Each time out in the rain I am constantly checking to see if anything is coming through but it never does. The last few times out, I was in the pouring rain and it lasted for hours but again the worst it ever got was the inside felt only slightly damp. I think that as I weathered it first, the threads of the weave have swollen and meshed pretty good and can gladly say that I have not yet had any sort of leak.
Snow

Well a few of us managed to get out in the little bit of snow we had and I have to say the SoulPad performed excellently. Not only did it protect us from the snow and icy sleet, it also blocked the wind very well, so there was no chill factor to contend with. Three of us were in the tent and were just using mats and sleeping bags and we were all warm and none of us were ever uncomfortable over the weekend. We didn’t have a stove but we did have a paraffin lamp that belted out a nice bit of heat. This was enough to keep the tent at an ambient temperature at ground level and warm higher up. I can imagine that with a stove in there, you could be comfortable in the lowest temperatures Scotland has.
Group shelter:

One of the biggest pluses for me is not only will the family be comfortable and have plenty of room when out camping it will also be ideal for our meet ups. It will give us that extra room either for people to use and sleep in or for storing gear. It will also make the perfect outdoor “classroom” with the walls up in the summer or all battened down with a heat source for the winter.
This SoulPad is recommended to sleep four without a stove in the tent or two with a stove. To be honest I think this is a cautious recommendation; I would not go for more than three with a stove in to be on the safe side but without a stove there is heaps of room and you could definitely fit in more than the recommendation. How many more will depend on how close people are willing to sleep next to each other. We worked out that if everybody lay with feet towards the central pole and slept in positions like a clock you could easily fit six or seven with room for kit between each person. If using to just sit down in you can add much more to that number.
Conclusion:
Obviously, the SoulPads are not intended for lightweight camping or for when you are on the move a lot, but when you need base shelter that gives you plenty of room and versatility this is an excellent option. Not only can it be used as a sleeping area but if you add a stove into the mix, you have a heated shelter that can be used throughout the year in all weather and temperatures, and it can be used by a whole group at the same time.
To be honest I did not think it would stand up to the weather as well as it did so I am very pleased to be proven wrong here. I am really looking forward to getting out when there is a lot more snow, as I know I will be comfortable.
The biggest thing with the canvas tents is you need to look after it far better than a synthetic tent as they can be prone to mildew and rot if packed away wet/damp. Nevertheless, as long as you are sensible and take the time to dry it off and clean any stains, mud etc. from it and give it a coating of water proofer when it needs it the SoulPad should last for years.
I am very pleased with the SoulPad it is a high quality item made to a very good standard and although it is an investment in my opinion, it is well worth it. It will certainly stand me and the N.E.S group in good stead for years to come.
Leave A Comment
You must be logged in to post a comment.