When I first started venturing into the world of bushcraft I got into carving spoons and bowdrill sets. It’s like a rite of passage with most bushcrafters to crack these skills. As time went on I began to explore the world of pot hangers and eventually these little devilish collapsible pot hangers.
This post will take you through the steps I went through to make a mortise-and-tenon collapsible pot hanger. I have included a couple of other types and links to show you how they are made or used. As you can see in the picture on the left, one of the hooks is pointing down and one is pointing upwards. This set up makes for a great pot hanger but sadly you don’t find many trees with this configuration of branches.
Mortise and Tenon Pot Hanger

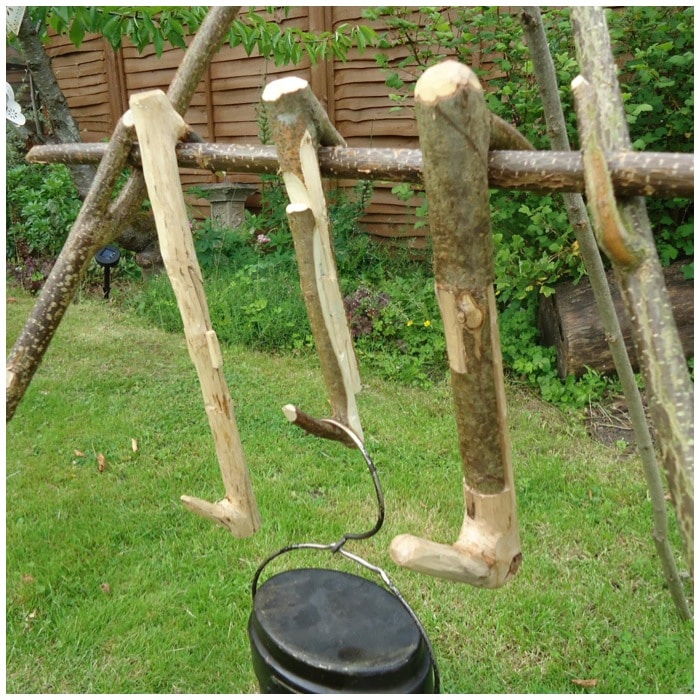
Here are the three different types of pot hangers I will discuss here, from left to right: the wedge hanger, the dovetail hanger and the mortise-and-tenon hanger.
The trio

The wedge hanger
I call this the wedge hanger as the two pieces are kept in place by a single wedge of wood in the middle. There are a lot of angles to take into account with this hanger and as with all of the hangers in this post I would advise you to make it out of dead standing wood. If you were to use green wood you might find that the pieces do not fit together any more as it dries out. I found a good tutorial on making this hanger on the Bearclaw Bushcraft site.
Wedge Pot Hanger

The dovetail hanger
This hanger replaces the wedge with a dovetail joint in the middle. I found it surprisingly easy to carve. The trick is to make the joint snug but not too tight. You want just enough friction between the two pieces to hold it all together but still be easy enough to pop apart when you are finished with it. A good video by GJohnridge11 on You Tube shows this hanger but I am afraid not how it is carved.
Dovetail Pot Hanger

All the hangers so far have hooks pointing in opposite directions and on opposite sides. I have had discussions with fellow bushcrafters on this and some argue that a pot may slip off if the hooks are on opposite sides. I have made a few hangers now with hooks on opposite sides and on the same side as in the picture below. As of yet I personally have not had problems with either method.
Wedge Pot hanger with both hooks on the same side

The reason I like these hangers is that they are easy to store and carry with you. Once broken apart they fit inside your pot or kettle snugly.
Neatly stowed away

Mortise-and-tenon hanger
I found two dead pieces of wood of similar widths with good strong branches leading off them. After stripping the bark off one I noticed there was a fungal infection inside it. I decided to try using it anyway as the wood still felt strong. I left the bark on the other piece of wood as it had attractive honeysuckle markings going around it.
I trimmed the bottom piece so it was the same length as the top piece.
Trimming to size

The tenon limb
Using a pencil I marked out all the areas of wood I was going to cut out. (I should have shaded the areas of wood I would be cutting out with my pencil for the camera, see the bottom picture for how this limb will finally look.) This limb is called the tenon limb.
Mark out the shape of the tenon

I used a small hand saw to make some stop cuts on the pencil marks. These stop cuts are particularly useful when you start carving with your knife to stop any splits running off into areas of wood you want to keep.
Stop Cuts – Part 1

The stop cuts done, I used my knife to start carving the excess wood away. I used small cuts all the time, my thumbs on the back of the knife for fine control. This is a great activity to do while sitting around the campfire where you can relax and take your time.
Stop Cuts – Part 2

Once you get one block out it is time to take out the next block of excess wood. I am keeping the wood that is under the blade and removing the wood directly to the right of it.
Forming the tenon

Finally I used my saw to cut out the tenon at the end of the piece of wood. This is a small rectangular piece of wood at the end of the limb as you can see in the bottom picture.
The finished tenon

The mortise limb
I cut a stop cut into the mortise limb where I had measured that the tenon limb would fit snugly against it. You have to judge this by using the tenon limb as a measuring stick and saw to a depth that will make the limbs fit together well.
Mark a stop cut

Once the stop cut is in place you can easily batton the excess wood out with your knife. I am using the tenon limb as a hammer at this stage.
Batton out the waste wood

You can see in the top picture that the two pieces fit well together now so I marked out the area of the joint I needed to cut out on the mortise limb. I used the protruding rectangle of wood on the tenon limb to mark out the corresponding section of wood I needed to carve out of the mortise limb.
Once marked out I used the tip of my knife to start carving out the rectangular hole I needed to make in the mortise limb.
Draw out the mortise

Again this was a piece of carving I took my time with. I placed the mortise limb on a work surface rather than holding it in my hand, where any slip of the blade could have meant a nasty cut.
Carve out the mortise

Eventually I worked my way through the limb and carved out a rough rectangular shape.
Form a neat rectangle

If you have taken your time and not cut outside of the pencil markings the fit of the Tenon and the Mortise should be snug. If it is too tight make some cuts where you feel there is resistance and keep trying to see if both pieces will fit together.
The fit should be snug but not overly tight

Eventually both pieces fitted well together but disaster struck for me here. I was showing the hanger to a friend and was explaining it is very strong on the vertical plane, ie when holding a pot, but very weak on any other plane, ie if you twist this hanger it will break.
Just as I was explaining this my friend did indeed twist the hanger as he tried to pull it apart and the tenon joint simply snapped. The fact that the tenon had some rot in it did not help but I had tried it out earlier and it did take the weight of a heavy Dutch Oven. To separate the limbs you need to push on the rectangular tenon so it pops out of the mortise slot: do NOT twist!
A trimmed but flawed tenon

Still, it didn’t take long to make up another tenon limb to fit the original mortise limb.
Tenon Mark 2

All that was left to do was tidy up the hooks, put the limbs together and hang a pot.
Mortise-and-tenon hanger in use
I can’t remember where I came across this hanger (somewhere on the internet) so if anyone knows where this hanger originated please drop me a message. Even though it looks complex to begin with, once you get working on it it is easy enough to do and a joy to craft as long as you take your time with the fiddlier saw and knife tip bits.
Closed and open

I filled this Dutch Oven with water and got my two little helpers to show you how strong this hanger can be.
One very strong pot hanger

Some other sites on the wedge hanger you might find interesting:
Southwest Indiana Bushcraft Bill
Cheers
George
Bushcraft Days

Leave A Comment
You must be logged in to post a comment.